Building TUIs with Golang and tview
Published: Aug 19, 2025
Last updated: Aug 19, 2025
Long time avid TUI fan with zero contributions.
Given the amount of time I spend working with TUIs like k9s, lazygit, yazi and dive, I decided the time is now ripe to start learning the ins and outs of TUI development.
This post will be a walkthrough of me testing out the waters and learning more about tview, a Golang package for building TUIs.
Prerequisites
This post expects that you've worked with Golang before.
I will be using go.1.24.5.
Getting started
Start by initialising a new Go module and fetching the required packages.
# Create a project directory mkdir blog-tview-introduction cd blog-tview-introduction # Initialise the module go mod init tview.dennisokeeffe.com # Fetch the tview package go get github.com/rivo/tview # Create a main.go file touch main.go
At this point, we are ready to get started.
Exploring tview
A great place to start getting to understand the package is the tview wiki and the pkg.go documentation page.
The wiki outlines a number of basic components that can be used for drawing out our TUI and we can reinforce some of what we learn by checking out the docs.
We can update main.go to start with the example Grid component:
package main import ( "github.com/rivo/tview" ) func main() { newPrimitive := func(text string) tview.Primitive { return tview.NewTextView(). SetTextAlign(tview.AlignCenter). SetText(text) } menu := newPrimitive("Menu") main := newPrimitive("Main content") sideBar := newPrimitive("Side Bar") grid := tview.NewGrid(). SetRows(3, 0, 3). SetColumns(30, 0, 30). SetBorders(true). AddItem(newPrimitive("Header"), 0, 0, 1, 3, 0, 0, false). AddItem(newPrimitive("Footer"), 2, 0, 1, 3, 0, 0, false) // Layout for screens narrower than 100 cells (menu and side bar are hidden). grid.AddItem(menu, 0, 0, 0, 0, 0, 0, false). AddItem(main, 1, 0, 1, 3, 0, 0, false). AddItem(sideBar, 0, 0, 0, 0, 0, 0, false) // Layout for screens wider than 100 cells. grid.AddItem(menu, 1, 0, 1, 1, 0, 100, false). AddItem(main, 1, 1, 1, 1, 0, 100, false). AddItem(sideBar, 1, 2, 1, 1, 0, 100, false) if err := tview.NewApplication().SetRoot(grid, true).SetFocus(grid).Run(); err != nil { panic(err) } }
Most of the above code should make sense just from a read through:
- We built out a few primitives (more on this later) for the "Menu", "Main content" and "Side bar".
- We built out a grid that adds a new "Header" and "Footer" primitive.
- We add two different layouts based on available cell size.
- We start the application with the grid as our root and focus.
We can visualize this TUI by running go run main.go:

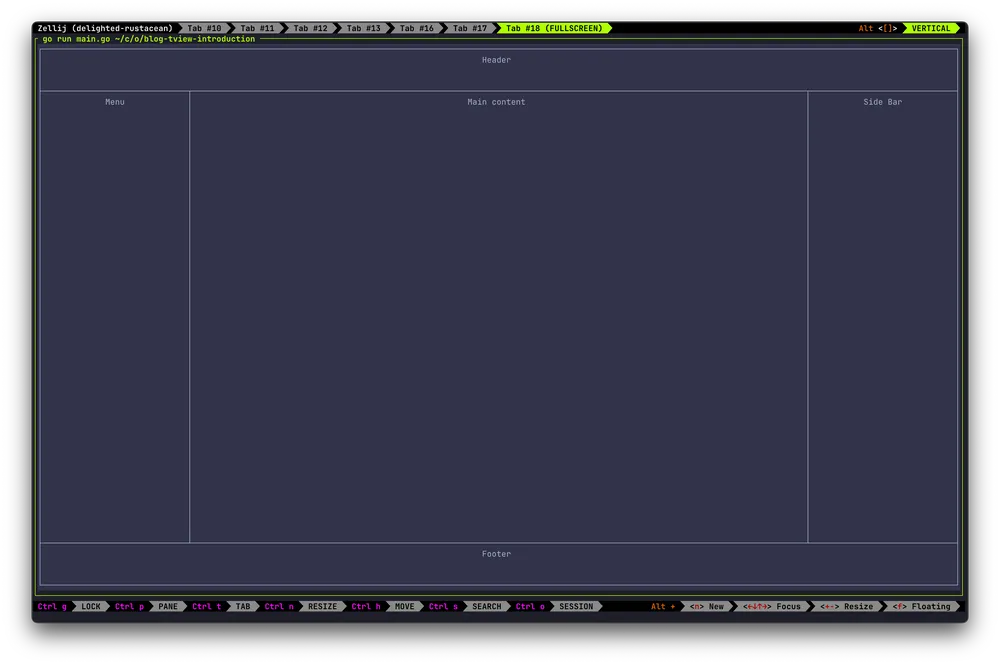
Visualizing the full TUI
As you may already have expected from the comments above, a smaller viewport for our terminal will change what is rendered:
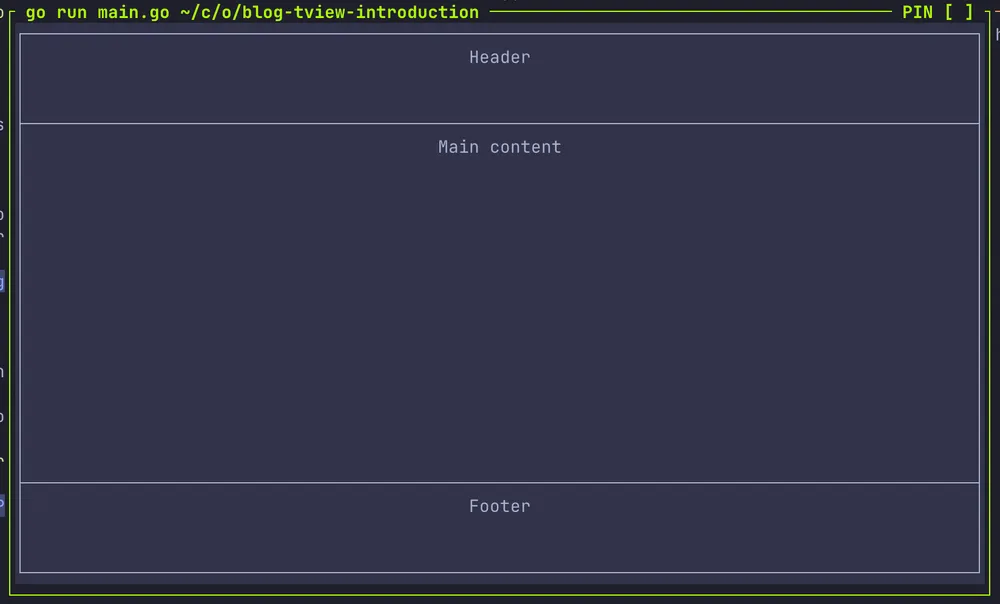
Responsive layout
The part of the code which might not make so much sense right now are the arguments for methods such as AddItem.
Let's walk through a few of these to start getting a sense for the package.
AddItem is a Grid method with the following definition:
func (g *tview.Grid) AddItem(p tview.Primitive, row int, column int, rowSpan int, colSpan int, minGridHeight int, minGridWidth int, focus bool) *tview.Grid
So reading an example like AddItem(newPrimitive("Header"), 0, 0, 1, 3, 0, 0, false) from left to right, we can understand the numerical arguments as:
- Row 0.
- Column 0.
- Row span 1.
- Column span 3.
- Minimum height 0.
- Minimum width 0.
We can assume that row span and column span relate to our default values, so exploring the SetRows and SetColumns method definitions can help us work backwards to understand the relationship:
func (g *tview.Grid) SetColumns(columns ...int) *tview.Grid func (g *tview.Grid) SetRows(rows ...int) *tview.Grid
Both functions follow the same principle, so it's best to read an excerpt from the documentation:
SetColumns defines how the columns of the grid are distributed. Each value defines the size of one column, starting with the leftmost column. Values greater than 0 represent absolute column widths (gaps not included). Values less than or equal to 0 represent proportional column widths or fractions of the remaining free space, where 0 is treated the same as -1. That is, a column with a value of -3 will have three times the width of a column with a value of -1 (or 0). The minimum width set with SetMinSize() is always observed.
So in our definition of SetColumns(30, 0, 30) and SetRows(3, 0, 3), we are basically setting the values for 3 rows and 3 columns, with the 0 value being the remaining cell space after the first and last of each row/column are set.
We can understand this visually from the screenshots above. Basically, we can expect our footer to double in size if we bump the row size for the footer to 6.
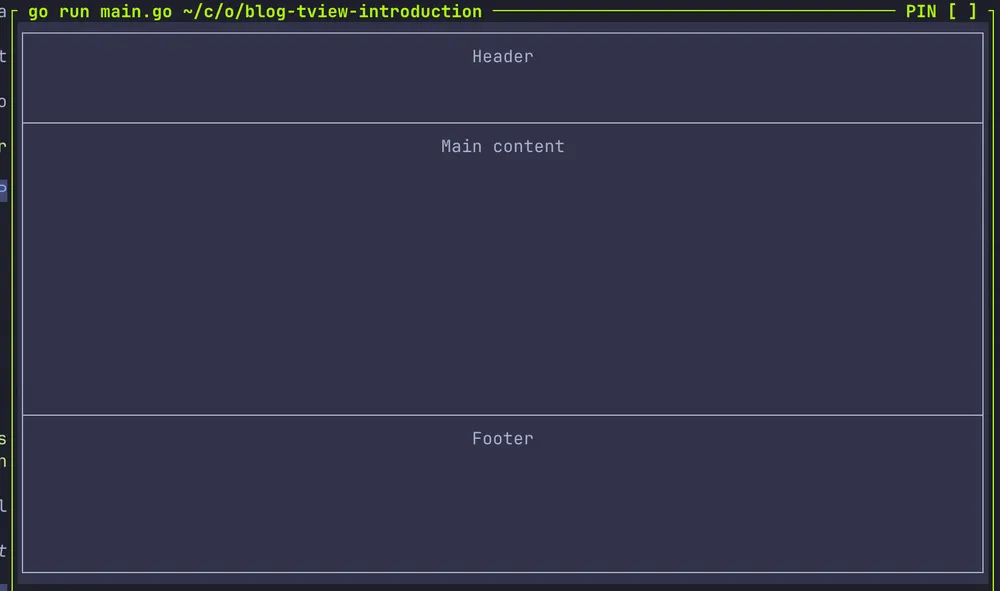
Doubling the footer size
Nice.
Making things interactive
From little things, big things grow. With that pearl of wisdom out of the way, let's add in a few more elements including a InputField to start to understand a bit more about interactivity.
package main import ( "github.com/gdamore/tcell/v2" "github.com/rivo/tview" ) func main() { app := tview.NewApplication() newPrimitive := func(text string) tview.Primitive { return tview.NewTextView(). SetTextAlign(tview.AlignCenter). SetText(text) } // NEW: Adding the inputField inputField := tview.NewInputField(). SetLabel("Enter value: "). SetFieldWidth(0). SetFieldTextColor(tcell.ColorBlack). SetFieldBackgroundColor(tcell.ColorWhite). SetDoneFunc(func(key tcell.Key) { app.Stop() }) // NEW: Adding the flex container header := tview.NewFlex(). SetDirection(tview.FlexRow). AddItem(newPrimitive("Header"), 2, 0, false). AddItem(inputField, 0, 1, true) menu := newPrimitive("Menu") main := newPrimitive("Main content") sideBar := newPrimitive("Side Bar") grid := tview.NewGrid(). SetRows(3, 0, 6). SetColumns(30, 0, 30). SetBorders(true). AddItem(header, 0, 0, 1, 3, 0, 0, false). AddItem(newPrimitive("Footer"), 2, 0, 1, 3, 0, 0, false) // Layout for screens narrower than 100 cells (menu and side bar are hidden). grid.AddItem(menu, 0, 0, 0, 0, 0, 0, false). AddItem(main, 1, 0, 1, 3, 0, 0, false). AddItem(sideBar, 0, 0, 0, 0, 0, 0, false) // Layout for screens wider than 100 cells. grid.AddItem(menu, 1, 0, 1, 1, 0, 100, false). AddItem(main, 1, 1, 1, 1, 0, 100, false). AddItem(sideBar, 1, 2, 1, 1, 0, 100, false) if err := app.SetRoot(grid, true).SetFocus(inputField).Run(); err != nil { panic(err) } }
In our code above, we've updated the grid header code we had before to add in a new header variable that we've declared.
That header in itself is adding the primitive text and also the inputField variable which we've declared above.
You can start to see a pattern occurring now with the AddItem method also appearing with the tview.NewFlex component. The method in this case has a different method signature, but I'll omit going over it as you should begin to understand that you can check the docs/intellisense and get a feel for what numeric values change.
The current state of the TUI looks like so:
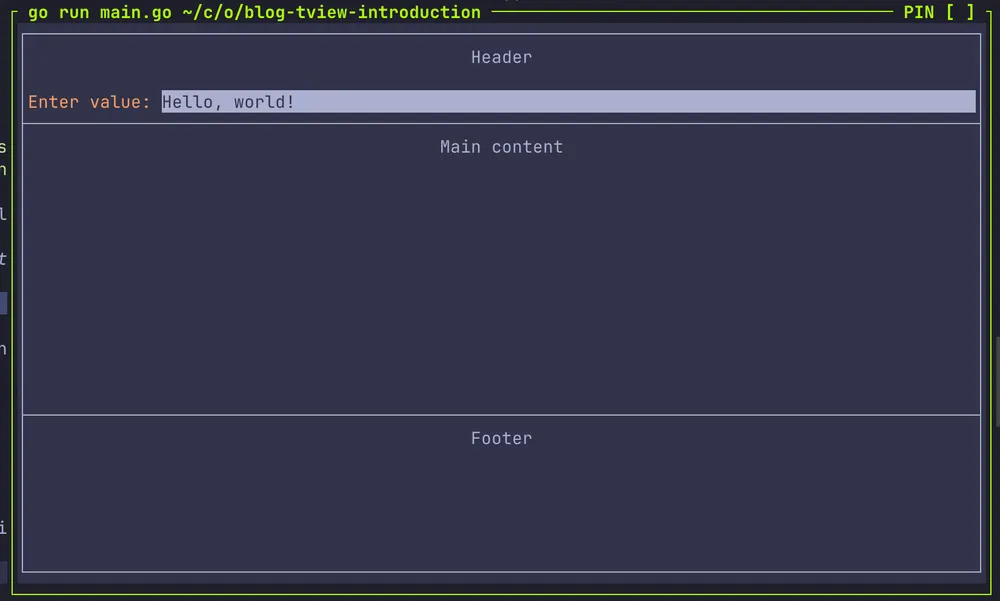
Seeing our input value
With the inputField declaration, we can see the SetDoneFunc method that we invoke which takes an anonymous function.
In our case, we've added app.Stop() as part of the anonymous function, so when we hit enter it will result in closing our application.
(From the docs) The callback function is provided with the key that was pressed, which is one of the following:
- KeyEnter: Done entering text.
- KeyEscape: Abort text input.
- KeyTab: Move to the next field.
- KeyBacktab: Move to the previous field.
We can make use of this to make our interactivity a little more interesting.
Let's abstract the main content into a new text view and update our SetDoneFunc anonymous function to update the text with the value added.
package main import ( "github.com/gdamore/tcell/v2" "github.com/rivo/tview" ) func main() { app := tview.NewApplication() newPrimitive := func(text string) tview.Primitive { return tview.NewTextView(). SetTextAlign(tview.AlignCenter). SetText(text) } // NEW: Adding the main content to be updated mainContent := tview.NewTextView(). SetTextAlign(tview.AlignCenter). SetText("Main content - waiting for input...") inputField := tview.NewInputField(). SetLabel("Enter value: "). SetFieldWidth(0). SetFieldTextColor(tcell.ColorBlack). SetFieldBackgroundColor(tcell.ColorWhite) inputField.SetDoneFunc(func(key tcell.Key) { if key == tcell.KeyEnter { inputValue := inputField.GetText() mainContent.SetText("You entered: " + inputValue) inputField.SetText("") app.SetFocus(inputField) } }) header := tview.NewFlex(). SetDirection(tview.FlexRow). AddItem(newPrimitive("Header"), 2, 0, false). AddItem(inputField, 0, 1, true) menu := newPrimitive("Menu") sideBar := newPrimitive("Side Bar") grid := tview.NewGrid(). SetRows(3, 0, 6). SetColumns(30, 0, 30). SetBorders(true). AddItem(header, 0, 0, 1, 3, 0, 0, false). AddItem(newPrimitive("Footer"), 2, 0, 1, 3, 0, 0, false) // Layout for screens narrower than 100 cells (menu and side bar are hidden). grid.AddItem(menu, 0, 0, 0, 0, 0, 0, false). AddItem(mainContent, 1, 0, 1, 3, 0, 0, false). AddItem(sideBar, 0, 0, 0, 0, 0, 0, false) // Layout for screens wider than 100 cells. grid.AddItem(menu, 1, 0, 1, 1, 0, 100, false). AddItem(mainContent, 1, 1, 1, 1, 0, 100, false). AddItem(sideBar, 1, 2, 1, 1, 0, 100, false) if err := app.SetRoot(grid, true).SetFocus(inputField).Run(); err != nil { panic(err) } }
Restarting our TUI, we can see what our UI looks like with text in the input:

Before hitting enter
And then after hitting the enter button:
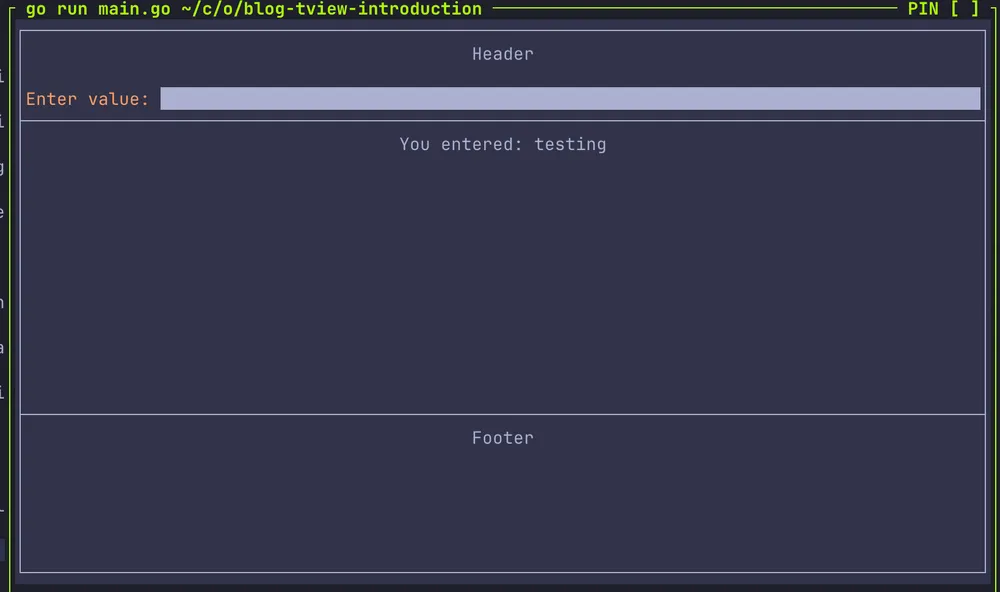
Text change after hitting enter
Great! Our TUI is looking a little boring, but we are making some progress.
Changing view focus
At this point, our supremely basic TUI can now dynamically update text based on it's input.
The InputField is currently our initial focus, but how can we swap between different grid items and change focus?
We can introduce the List TUI component and make some changes based on things we've already worked with in order to get a simple list we can navigate up and down, while pressing : to focus on the filter bar and enter to re-enter the main list content.
We will also update the footer now to dynamically show different text help messages based on which component we are focused on.
package main import ( "strings" "github.com/gdamore/tcell/v2" "github.com/rivo/tview" ) func main() { app := tview.NewApplication() newPrimitive := func(text string) tview.Primitive { return tview.NewTextView(). SetTextAlign(tview.AlignCenter). SetText(text) } // Sample data to filter items := []string{"Apple", "Banana", "Cherry", "Date", "Elderberry", "Fig", "Grape", "Honeydew", "Kiwi", "Lemon", "Mango", "Orange"} // Create the filterable list list := tview.NewList(). ShowSecondaryText(false). SetHighlightFullLine(true) // Function to populate/filter the list updateList := func(filter string) { list.Clear() for _, item := range items { if strings.Contains(strings.ToLower(item), strings.ToLower(filter)) { list.AddItem(item, "", 0, nil) } } } // Initially populate with all items updateList("") // Create dynamic footer for guidance text footer := tview.NewTextView(). SetTextAlign(tview.AlignCenter). SetText("↑/↓ Navigate list • : Filter") // Function to update guidance text based on focus updateGuidance := func(focusedOnList bool) { if focusedOnList { footer.SetText("↑/↓ Navigate list • : Filter") } else { footer.SetText("Type to filter • Enter to focus list") } } inputField := tview.NewInputField(). SetLabel("Filter: "). SetFieldWidth(0). SetFieldTextColor(tcell.ColorBlack). SetFieldBackgroundColor(tcell.ColorWhite) // Add real-time filtering as user types inputField.SetChangedFunc(func(text string) { updateList(text) }) // On Enter, focus the list for navigation inputField.SetDoneFunc(func(key tcell.Key) { if key == tcell.KeyEnter { app.SetFocus(list) updateGuidance(true) } }) // Add list navigation - return to input on selection list.SetDoneFunc(func() { app.SetFocus(inputField) updateGuidance(false) }) // Handle keys for list: escape to return to input, ':' to focus filter list.SetInputCapture(func(event *tcell.EventKey) *tcell.EventKey { if event.Key() == tcell.KeyEscape { app.SetFocus(inputField) updateGuidance(false) return nil } else if event.Rune() == ':' { app.SetFocus(inputField) updateGuidance(false) return nil } return event }) header := tview.NewFlex(). SetDirection(tview.FlexRow). AddItem(newPrimitive("Header"), 2, 0, false). AddItem(inputField, 0, 1, true) menu := newPrimitive("Menu") sideBar := newPrimitive("Side Bar") grid := tview.NewGrid(). SetRows(3, 0, 6). SetColumns(30, 0, 30). SetBorders(true). AddItem(header, 0, 0, 1, 3, 0, 0, false). AddItem(footer, 2, 0, 1, 3, 0, 0, false) // Layout for screens narrower than 100 cells (menu and side bar are hidden). grid.AddItem(menu, 0, 0, 0, 0, 0, 0, false). AddItem(list, 1, 0, 1, 3, 0, 0, false). AddItem(sideBar, 0, 0, 0, 0, 0, 0, false) // Layout for screens wider than 100 cells. grid.AddItem(menu, 1, 0, 1, 1, 0, 100, false). AddItem(list, 1, 1, 1, 1, 0, 100, false). AddItem(sideBar, 1, 2, 1, 1, 0, 100, false) if err := app.SetRoot(grid, true).SetFocus(list).Run(); err != nil { panic(err) } }
Even though we've added quite a bit more code, the only real changes that we've made that look new are:
- The creation of the list.
- Abstracting the anonymous function and assigning it to
updateListwhere the logic filters a hardcoded list of strings. - Doing the same with an anonymous function
updateGuidancefor changing theTextViewfooter component text.
At this point, when we run go run main.go we start focused now on the main content list.
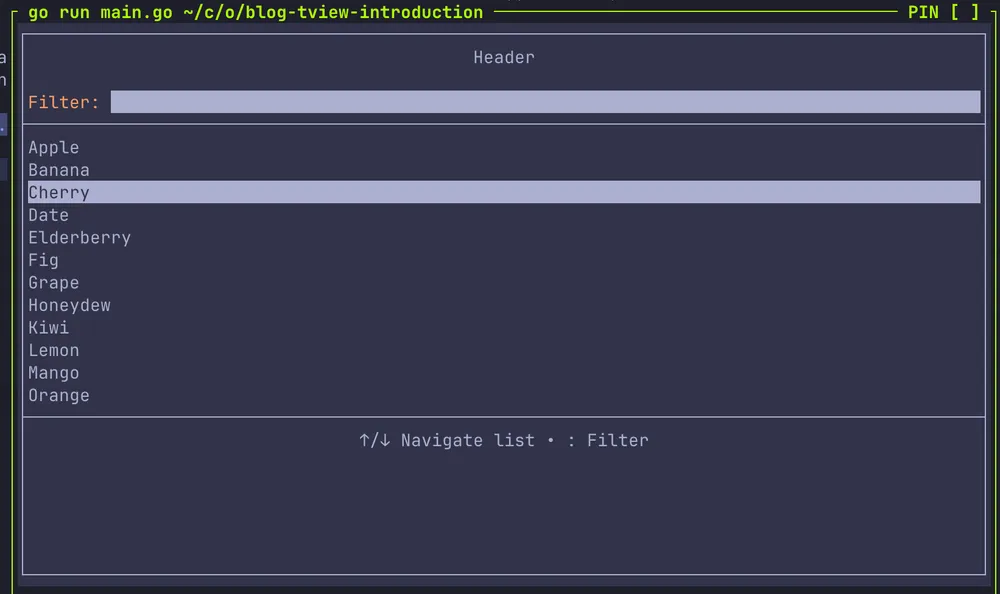
Our filterable list
We can toggle up and down to move through the list.
In order to focus on the InputField, we can press :. This focuses on the InputField and updates the footer helper text.
Typing in letters for a basic filter will narrow down the list, and we can hit enter/return in order to focus back on the list and navigate the filtered values.
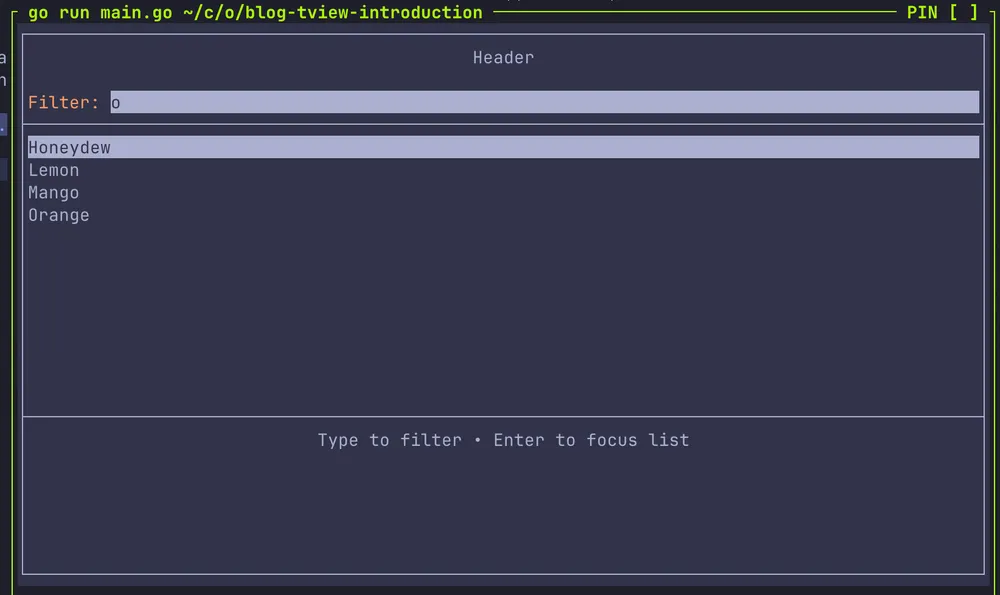
Filtered values after typing
Navigation
Finally, the last thing we will walk through is this idea of "simple navigation" where selecting a value will navigate into a "list detail" page from the "list" view and then enable a way to navigate back.
Again, we'll hardcode the detail strings for now, but the idea will be that we augment our "listeners" to jump back and forward from the "list" and "detail" view with the enter/escape button respectively.
The code now looks like the following:
package main import ( "strings" "github.com/gdamore/tcell/v2" "github.com/rivo/tview" ) func main() { app := tview.NewApplication() newPrimitive := func(text string) tview.Primitive { return tview.NewTextView(). SetTextAlign(tview.AlignCenter). SetText(text) } // Sample data to filter with details items := []string{"Apple", "Banana", "Cherry", "Date", "Elderberry", "Fig", "Grape", "Honeydew", "Kiwi", "Lemon", "Mango", "Orange"} // Sample detail data for each fruit details := map[string]string{ "Apple": "🍎 A crisp, sweet fruit that's perfect for snacking.\n\nNutritional Facts:\n• High in fiber\n• Rich in vitamin C\n• Contains antioxidants\n\nOrigin: Central Asia", "Banana": "🍌 A tropical fruit with potassium and natural sugars.\n\nNutritional Facts:\n• High in potassium\n• Good source of vitamin B6\n• Natural sugars for energy\n\nOrigin: Southeast Asia", "Cherry": "🍒 Small, sweet-tart stone fruits perfect for desserts.\n\nNutritional Facts:\n• Rich in antioxidants\n• Contains melatonin\n• Anti-inflammatory properties\n\nOrigin: Asia Minor", "Date": "🫒 Sweet, chewy fruits from date palm trees.\n\nNutritional Facts:\n• High in fiber\n• Rich in potassium\n• Natural sweeteners\n\nOrigin: Middle East", "Elderberry": "🫐 Dark purple berries known for immune support.\n\nNutritional Facts:\n• High in vitamin C\n• Rich in antioxidants\n• Immune system support\n\nOrigin: Europe", "Fig": "🟤 Sweet, soft fruits with edible seeds inside.\n\nNutritional Facts:\n• High in fiber\n• Good source of calcium\n• Contains potassium\n\nOrigin: Western Asia", "Grape": "🍇 Juicy fruits that can be eaten fresh or made into wine.\n\nNutritional Facts:\n• Contains resveratrol\n• Rich in vitamin K\n• Natural sugars\n\nOrigin: Middle East", "Honeydew": "🍈 Sweet, pale green melon with refreshing taste.\n\nNutritional Facts:\n• High water content\n• Rich in vitamin C\n• Low in calories\n\nOrigin: France", "Kiwi": "🥝 Fuzzy brown fruit with bright green flesh inside.\n\nNutritional Facts:\n• Extremely high in vitamin C\n• Good source of fiber\n• Contains vitamin K\n\nOrigin: China", "Lemon": "🍋 Sour citrus fruit used for cooking and drinks.\n\nNutritional Facts:\n• Very high in vitamin C\n• Contains citric acid\n• Low in calories\n\nOrigin: Asia", "Mango": "🥭 Tropical stone fruit with sweet, juicy flesh.\n\nNutritional Facts:\n• High in vitamin A\n• Rich in vitamin C\n• Contains folate\n\nOrigin: India", "Orange": "🍊 Citrus fruit packed with vitamin C and fiber.\n\nNutritional Facts:\n• Excellent source of vitamin C\n• High in fiber\n• Contains folate\n\nOrigin: China", } // Create the filterable list list := tview.NewList(). ShowSecondaryText(false). SetHighlightFullLine(true) // Function to populate/filter the list updateList := func(filter string) { list.Clear() for _, item := range items { if strings.Contains(strings.ToLower(item), strings.ToLower(filter)) { list.AddItem(item, "", 0, nil) } } } // Initially populate with all items updateList("") // Create dynamic footer for guidance text footer := tview.NewTextView(). SetTextAlign(tview.AlignCenter). SetText("↑/↓ Navigate list • : Filter") // Create detail view detailView := tview.NewTextView(). SetDynamicColors(true). SetWordWrap(true). SetText("Select an item to view details") // Create input field and header components inputField := tview.NewInputField(). SetLabel("Filter: "). SetFieldWidth(0). SetFieldTextColor(tcell.ColorBlack). SetFieldBackgroundColor(tcell.ColorWhite) header := tview.NewFlex(). SetDirection(tview.FlexRow). AddItem(newPrimitive("Header"), 2, 0, false). AddItem(inputField, 0, 1, true) menu := newPrimitive("Menu") sideBar := newPrimitive("Side Bar") // Create the grid early so it can be referenced by functions grid := tview.NewGrid(). SetRows(3, 0, 6). SetColumns(30, 0, 30). SetBorders(true). AddItem(header, 0, 0, 1, 3, 0, 0, false). AddItem(footer, 2, 0, 1, 3, 0, 0, false) // State management for current view var currentView string = "list" // "list" or "detail" // Function to update guidance text based on current state updateGuidance := func() { switch currentView { case "list": if app.GetFocus() == list { footer.SetText("↑/↓ Navigate • Enter Select • : Filter") } else { footer.SetText(": for focus on filter • Enter to focus list") } case "detail": footer.SetText("Escape to return to list") } } // Function to show detail view showDetail := func(itemName string) { if detail, exists := details[itemName]; exists { detailView.SetText(detail) } else { detailView.SetText("No details available for " + itemName) } currentView = "detail" updateGuidance() // Update grid to show detail view grid.RemoveItem(list) grid.AddItem(detailView, 1, 0, 1, 3, 0, 0, false) // narrow layout grid.AddItem(detailView, 1, 1, 1, 1, 0, 100, false) // wide layout app.SetFocus(detailView) } // Function to show list view showList := func() { currentView = "list" updateGuidance() // Update grid to show list view grid.RemoveItem(detailView) grid.AddItem(list, 1, 0, 1, 3, 0, 0, false) // narrow layout grid.AddItem(list, 1, 1, 1, 1, 0, 100, false) // wide layout app.SetFocus(list) } // Add real-time filtering as user types inputField.SetChangedFunc(func(text string) { updateList(text) }) // On Enter, focus the list for navigation (ignore Escape) inputField.SetDoneFunc(func(key tcell.Key) { if key == tcell.KeyEnter { app.SetFocus(list) updateGuidance() } // Explicitly ignore Escape key - do nothing }) // Add list navigation - show detail view on selection list.SetDoneFunc(func() { currentIndex := list.GetCurrentItem() itemText, _ := list.GetItemText(currentIndex) showDetail(itemText) }) // Handle keys for list: ':' focuses filter, Enter shows detail when on main list screen list.SetInputCapture(func(event *tcell.EventKey) *tcell.EventKey { // Only handle keys when we're in list view (not detail view) switch currentView { case "list": if event.Rune() == ':' { app.SetFocus(inputField) updateGuidance() return nil } else if event.Key() == tcell.KeyEnter { // Explicitly handle Enter to show detail view currentIndex := list.GetCurrentItem() itemText, _ := list.GetItemText(currentIndex) showDetail(itemText) return nil } else if event.Key() == tcell.KeyEscape { // Do nothing return nil } case "detail": if event.Key() == tcell.KeyEscape { showList() return nil } } // Let all other keys pass through return event }) // Layout for screens narrower than 100 cells (menu and side bar are hidden). grid.AddItem(menu, 0, 0, 0, 0, 0, 0, false). AddItem(list, 1, 0, 1, 3, 0, 0, false). AddItem(sideBar, 0, 0, 0, 0, 0, 0, false) // Layout for screens wider than 100 cells. grid.AddItem(menu, 1, 0, 1, 1, 0, 100, false). AddItem(list, 1, 1, 1, 1, 0, 100, false). AddItem(sideBar, 1, 2, 1, 1, 0, 100, false) // Initialize guidance text updateGuidance() app.SetInputCapture(func(event *tcell.EventKey) *tcell.EventKey { if currentView == "detail" && event.Key() == tcell.KeyEscape { showList() return nil } // Let all other keys pass through return event }) // Set up global input capture to handle Escape only in detail view if err := app.SetRoot(grid, true).SetFocus(list).Run(); err != nil { panic(err) } }
It's fairly rough code, but the list.SetInputCapture anonymous function here handles the filter focus and navigation to the "detail" view.
For navigating back, we use app.SetInputCapture to handle the escape button to invoke showList().
Running go run main.go shows a familiar landing view for our TUI.
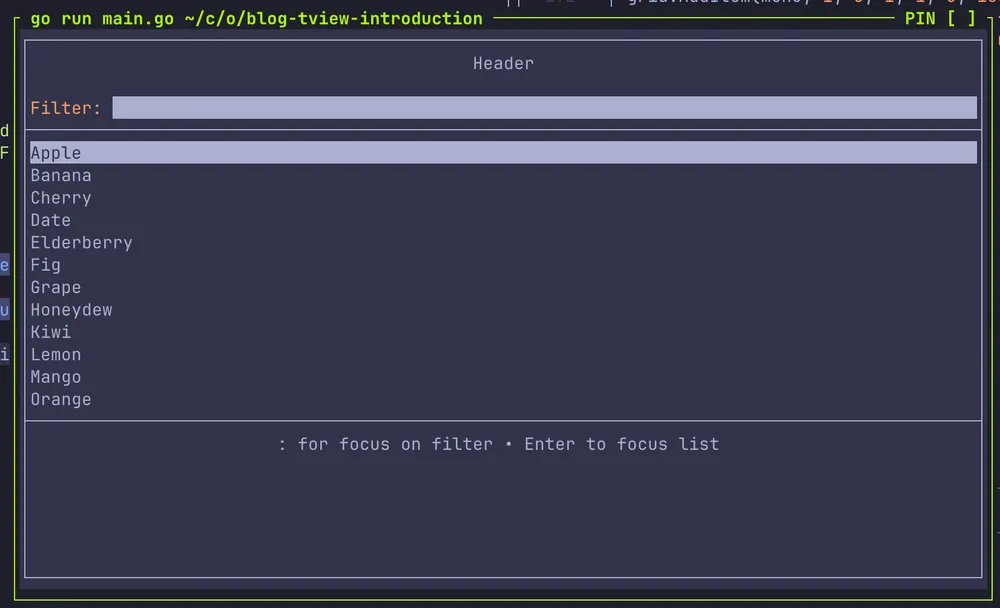
Our list view
Selecting enter onto any of our list items now will shift us into the "detail view" to see our hardcoded detail text that maps to the selected value:
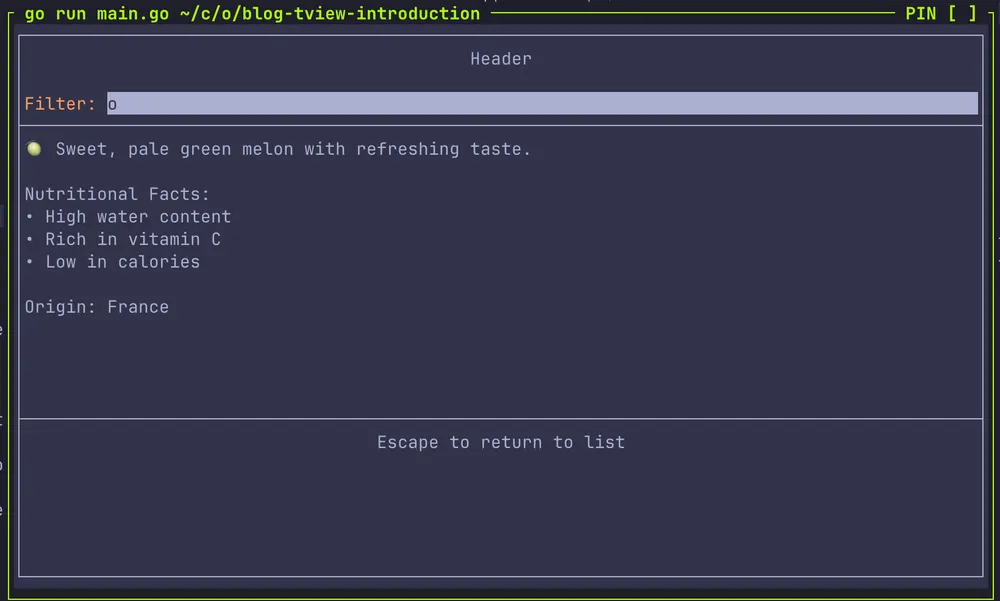
A detail view for a list item
Cool beans. At this point, we can visually see how we can set different views for our TUI.
Where to next?
At this point, I'll call it on the blog post. This should be enough to help you on your way to playing around with components and UIs and shows some of the more common workflows you might expect.
As for next steps, you could either augment this simple example to refactor and improve the handlers, or add more handlers for toggling between a number of different views.
Afterwards, instead of having hardcoded values, you could try implementing a TUI that uses dynamic data coming from a database somewhere.
Referring to the tview GitHub wiki and online documentation will go a long way from here.
Conclusion
Today's post builds up a simple TUI with Golang and tview from first steps until we have a simple application with navigation and filtering.
Although trivial in nature, my hope is that this guide is enough to get you comfortable with where to go from here and how to reference the documentation.
Links and Further Reading
- k9s - Kubernetes CLI for managing clusters
- lazygit - Simple terminal UI for git commands
- yazi - Blazing fast terminal file manager
- dive - Tool for exploring Docker image layers
- tview - Terminal UI library for Go
- tview wiki - Official tview documentation and examples
- tview pkg.go documentation - Complete API reference
Photo credit: pcbulai


Building TUIs with Golang and tview
Introduction
